Devoted to exploring off the beaten path for beautiful waterfalls, wildflowers, and landscapes in West Virginia.

Friday, September 30, 2016

Three Tips for Better Fall Photographs

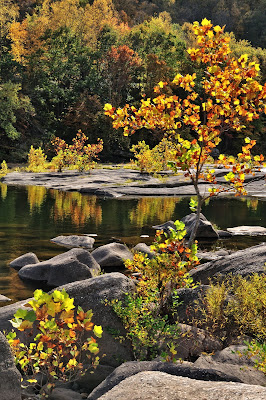
Though digital cameras are technologically impressive, none of them can capture a scene as well as the human eye and mind working together. Aware of the limitations of their technology, camera manufacturers have added features to compensate for them. In this article, I offer three tips on how to use these features to improve the photography of the brilliant colors of fall. To illustrate my tips I will refer to a photograph I took in the Fall of 2012 at the New River Drys. 
 
Briery Knob

Tip #1: Experiment with the White Balance. 

White balance settings on your camera compensate for the kind of light illuminating the scene you are shooting. As evidenced by the color of the sky, a sunny day sheds a lot of blue light. Your eye working with your mind automatically tones down the excess of blue light in such a way that a white object will still appear white to the eye. But a camera does not do this. It simply records without bias the colors of light hitting its sensor. 
Example Photo
If your photographs have a blue cast to them or if colors look duller than you remember them, experiment with white balance. The menu choices for white balance vary among cameras, but for outdoor use most will offer selections such as: Auto, Daylight (Sunny), Cloudy, and Shade. When shooting a fall scene, I suggest you take a photograph from the same place using each of the white balance settings on your camera, including auto, and compare the results to what you see. Then choose the white balance that best represents what you’re seeing. Because lighting changes, periodically check your white balance. In the example photograph above, even though I checked other white balance settings, I chose auto.
Babcock State Park

Tip #2: Experiment with Exposure Settings. 

Exposure settings control the amount of light allowed to make each image. Under-exposed images are excessively dark and detail is lost in shadowy areas. Over-exposed images are excessively bright, and colors can appeared washed out, meaning overly white and lacking in full rich color. In my opinion, the bright colors of autumn leaves are more frequently over-exposed than under-exposed. 
Highland Scenic Highway
Therefore, I intentionally under-expose shots of brilliant fall color. Many cameras automatically determine the exposure, but include a feature to manually change it. Exposure can be adjusted by the EV settings (Exposure value). Generally EV settings start at 0 and can be adjusted up or down in units of 1/3. Increasing the EV by +1/3, +2/3, or more brightens the image. Decreasing the EV to –1/3, -2/3, or more darkens the image. To take the sample image, I adjusted the EV down to –1 1/3 because of the bright conditions. I was facing the sun, and light was reflecting off the water. Decreasing the EV also made the sunlit leaves stand out by darkening the areas surrounding them.
Highland Scenic Highway

Tip #3: Use Backlighting to Brighten the Leaves. 

As fall progresses, leaf colors fade. To squeeze the last drop of color from the leaves in the example image, I chose to photograph them with backlighting, which means “to light from behind.” In nature photography the sun is the primary light source, therefore, to backlight autumn leaves keep them between you and the sun. With backlighting even fading leaves are brighter, more colorful, and often appear to glow. 
Dolly Sods
Fall colors are fleeting, and memories fade. But a good photograph is lasting.  I hope these tips will help you preserve the beauty of autumn foliage for many years to come.

No comments:

Post a Comment